Why your 2D scenes look flat: ambient tint, light falloff and three more 2D lighting techniques
Five cheap 2D lighting techniques on the same night scene, side by side: ambient tint, soft light falloff, shadows, flicker and glow. Walk through them yourself, then add them to your game.
What we asked“Make a web page that demonstrates the 2D lighting techniques that make flat scenes feel like places one at a time, so anyone can see and feel each one within a few seconds. For each one, show the same short moment side by side: without it on the left, with it on the right, playing in a loop, with a caption that says what just happened and a replay button. Where it helps, let me play the moment myself. It will sit inside a blog post about 720 pixels wide, so it has to look good at that width and on a phone. Also make each one viewable alone with ?trick=<id>&solo, using these ids: ambient-tint, light-falloff, shadows, flicker, glow. Use the same small night scene with a torch and a character in every demo, and on the left side show it without that one technique, with the others still on where they are needed. Use the internet freely for better results: free CC0 art, fonts or small libraries (for example Kenney's CC0 assets) are welcome; download anything you use into this folder so the page works without outside links, and list each item with its licence and source in CREDITS.md.”
What happened
- Loaded the lighting-2d skill
- Downloaded Kenney's CC0 Tiny Town and Tiny Dungeon sprites and the Pixelify Sans font
- Built one small night village with a torch and a traveller, shared by all five demos, with only that demo's technique turned off on the left
- Added a thin cool moonlight edge to the traveller, then softened it when it looked like a selection outline
- Let you walk the traveller by tapping, dragging or with the arrow keys, and added a broken lamp to the flicker demo
- Checked it at 720 px and at phone width with no errors
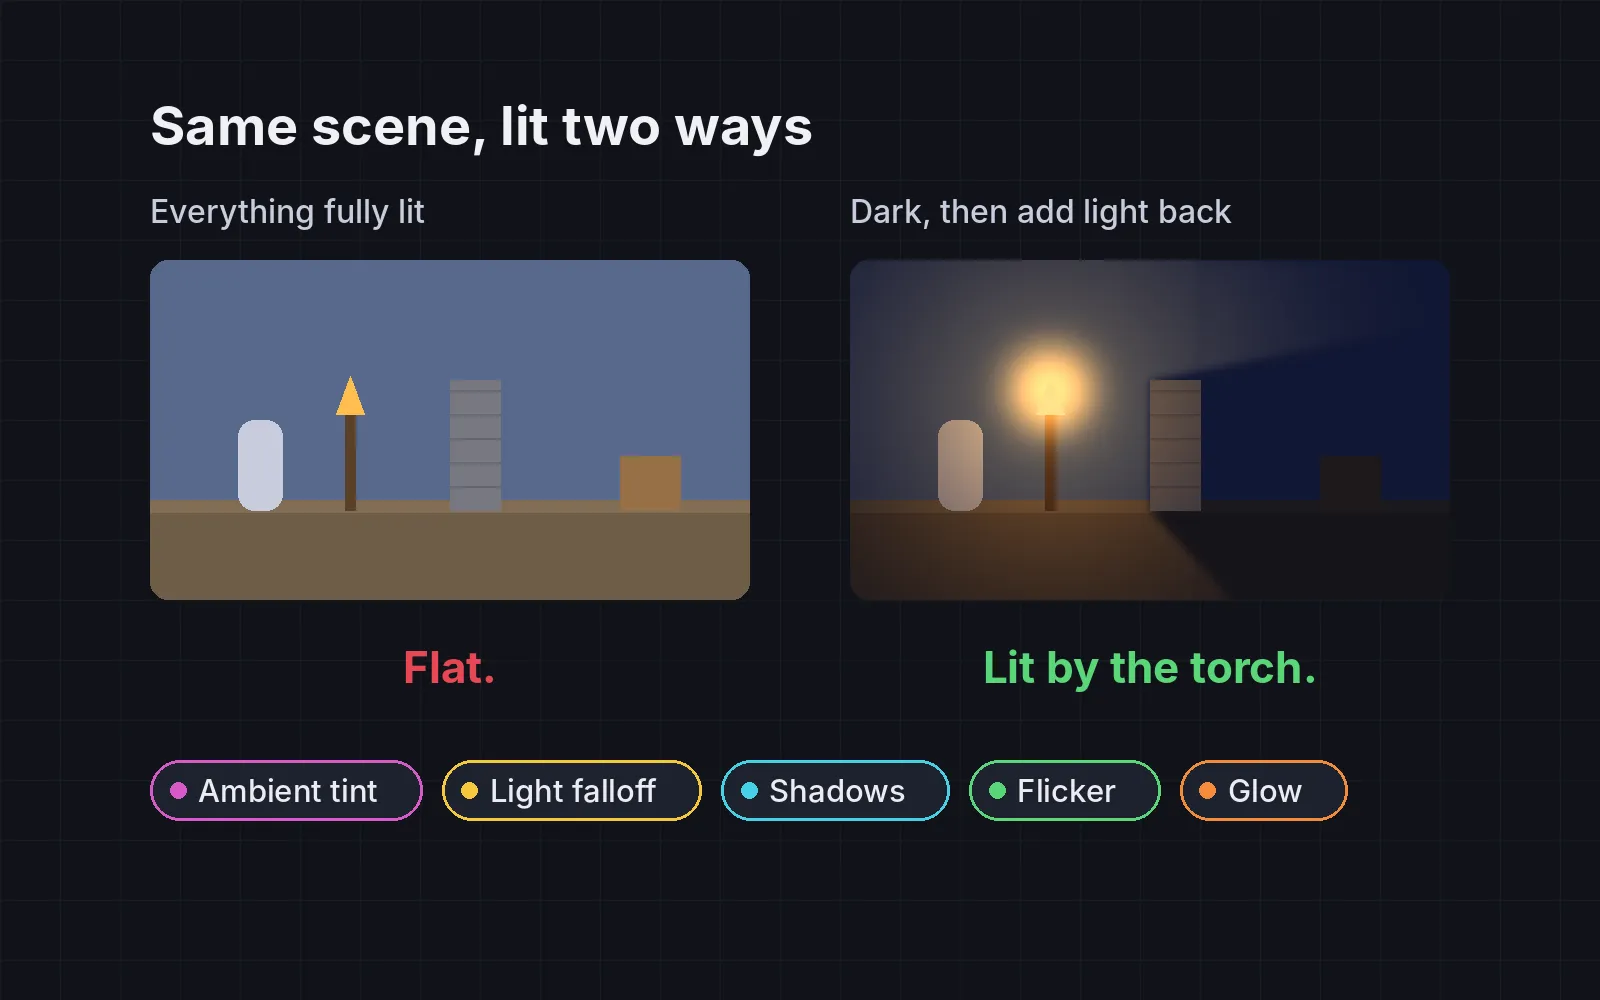
You’ve drawn a nice village, but at “night” it still looks like a picture with the brightness turned down. Nothing seems to come from anywhere. Most 2D engines light a scene the same way: darken everything with an ambient color, then add light back where the lights are. The five techniques below are the cheap parts of that recipe. Every demo uses the same village at night, with a torch and one traveller. The left side turns off only that demo’s technique; the other four stay on. Press Walk it yourself, then tap or drag on either picture (or use the arrow keys) to walk the traveller around on both sides at once.
1. Ambient tint
Multiply the whole scene by a dark color instead of showing it fully lit: a dark blue for night, a dim warm gray for a cave. Godot’s docs call this node CanvasModulate and explain why you need it: without it, the scene looks too bright, because 2D lights only brighten what’s already there (Godot docs). That’s exactly the left side: the torch is lit, but the village reads as midday and the torch adds nothing. Keep your UI outside the tint.
2. Light falloff
A light should be brightest at its centre and fade smoothly to nothing at its edge. In Godot, a 2D light is a texture added on top of the scene, and for a softer falloff you use a radial gradient from white in the centre to transparent (Godot docs). Our demo uses brightness = (1 − distance / radius)². On the left, the light is a flat disc, so the traveller stays dark and then pops to full brightness at its hard edge. On the right, they brighten little by little as they walk closer.
3. Shadows
Let walls and large objects block the light: from each light, cast a dark shape behind every object, pointing away from it. Godot does this with LightOccluder2D nodes, which tell the renderer which parts of the scene cast shadows (Godot docs). In the demo, the barrels throw dark wedges across the path, and the traveller darkens as they walk through them. The cheapest version, if you do nothing else, is a soft dark ellipse under every character.
4. Flicker
Fire doesn’t glow evenly. Change its brightness in small, uneven steps about 10 times a second, not in a smooth wave, which looks like breathing. Quake stored its flickering lights as strings of letters, from “a” (dark) through “m” (normal) to “z” (double brightness), played at 10 letters a second; according to a write-up by Alan Zucconi, Valve reused the same patterns in Half-Life, Half-Life 2 and Half-Life: Alyx (Alan Zucconi, Valve Developer Wiki). Our torch plays two of those Quake strings. Press Broken lamp to see the other use: a light that snaps on and off.
5. Glow
Give only the brightest things a halo: draw a bigger, blurred, semi-transparent copy behind them with additive blending. Godot’s docs describe both ways: turn on glow and lower its brightness threshold so only the bright pixels bloom, or use additive sprites, which are cheaper (Godot docs). On the right, the flame and every ember get a soft halo and look hotter than anything around them. On the left, the same pixels look painted on.
Keep it fast and readable
Light is mood, but the player still has to see what they’re doing. Some rules to tune by:
- Measure the frame time. In our demo, one picture took 5.9 ms per frame with lighting on and 3.4 ms with it off, with one light, under the 16.7 ms that 60 fps allows. Add lights one at a time and check again.
- Keep the player readable in the dark. Aim for a contrast of at least 3:1 between characters and the ground behind them. Our traveller first measured only 1.2:1. A thin cool edge of “moonlight” brought the outline to 3.0 to 3.9:1, but the body stayed around 2.5:1, because brightening it more would have hidden the falloff and shadows. That’s the trade-off you’ll tune too.
- Glow only the brightest few things. If everything glows, nothing does.
Colors matter as much as light here: the same hue shifts that make a ramp look rich also make a night tint look good. See five color palette tricks.
Add it to your game
- Copy the skill at the end of this page into your project.
- Ask your agent: “Light my 2D scenes so they don’t look flat.”
- Play it, then tune in plain words: “The night is too dark to see the player.”
Art in the demos: Tiny Town and Tiny Dungeon by Kenney (CC0). Font: Pixelify Sans by Stefie Justprince (SIL Open Font License 1.1). The torch, lamp and embers were drawn for the demo.
The skill that made it work
This is the whole skill we gave Claude Code. Copy it into your project and ask your agent to light your 2D scenes. Every technique sits behind its own switch, and the last step makes it check frame time and how well the player reads in the dark.
- Find the light sources (torches, lamps, windows, shots), the layers to light, and the UI that must not be lit.
- Put every trick behind one named switch in a single settings object, all on by default, so each can be compared with the unlit scene.
- ambient-tint. Multiply the scene by an ambient color instead of showing it fully lit: a dark blue-purple for night, a dim warm gray for interiors. Keep the UI outside it.
- light-falloff. Draw each light as a radial gradient added on top of the dark scene: brightest in the centre, fading smoothly to zero at its radius, for example brightness = (1 - distance / radius)^2. Give each light a color (orange torch, cyan magic). Never a hard-edged disc.
- shadows. Let walls and large objects block light: from each light, cast a dark polygon behind every occluder's edges (Godot's LightOccluder2D does this). Cheapest version: a soft dark ellipse under every character.
- flicker. Make fire and broken lamps change brightness in small random steps about 10 times per second, not a smooth sine wave. A broken lamp snaps on and off. Quake stored flicker as strings of letters from a (dark) to z, played at 10 per second, and Half-Life: Alyx reuses them.
- glow. Make the few brightest things glow: draw a larger, blurred, semi-transparent copy behind them with additive blending, or a bloom pass that only picks up pixels above a brightness threshold.
- Measure it. Report the frame time with lighting on and off (under 16.7 ms at 60 fps), the number of lights on screen, and the contrast ratio of the player and enemies against their background inside dark areas (at least 3:1).
Save it as .claude/skills/lighting-2d/SKILL.md in your project. Or connect your agent and type /aigamedev: it loads this skill with its reference files and the results from this post.